Roasted Spaghetti Squash with Mushroom & Lentil Sauce (Vegan)

Spaghetti Squash with Mushroom & Lentil Sauce

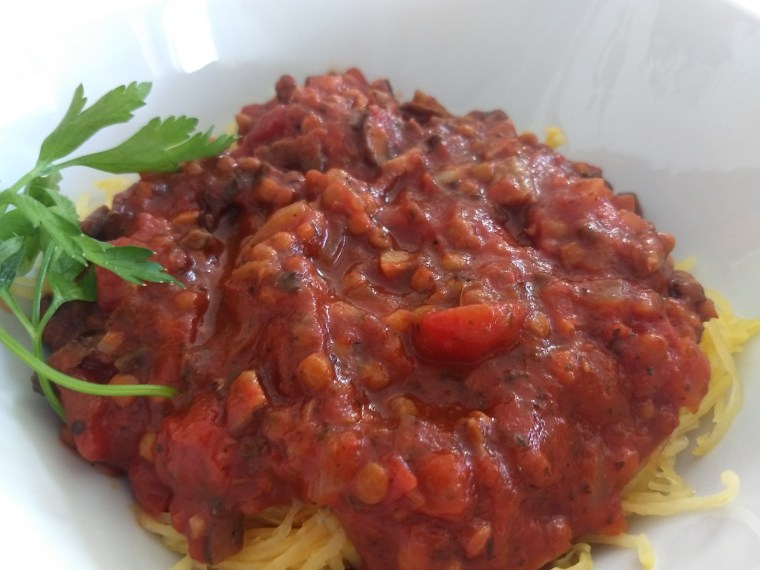
Today I’m excited to share an easy plant-based meal that’s as healthy as it is delicious. Let me start off by saying that I am in no way against traditional pasta. While it has been demonized and many people won’t touch it with a ten foot pole, I think pasta can actually make for a very nutritious meal, and I eat it often. However, there’s no denying that pasta is dense and there are times when I want something a little lighter, especially after the holidays. Enter spaghetti squash! With a mild flavor and pleasant texture, it’s the perfect canvas for a savory tomato sauce. Although it’s very low in calories (under 50 calories per cup), I find spaghetti squash to be very satisfying, particularly in the the cold winter months.

If you’re thinking that spaghetti squash is a pain to prep, I get it (it used to intimidate me and I never bought it), but I assure you it’s easy! You have three options for cooking it: One is to cut the squash in half and bake it, two is to bake the squash whole, and three is to microwave it. Obviously the easiest route is to throw it in the microwave, but I think it’s worth the additional time and effort to bake it in the oven. In terms of baking it whole vs. cut, if you have a suitable knife, I recommend cutting it in half. For a long time I never bothered and always baked it whole, but after some researching, I learned that cutting the squash allows it to caramelize a bit and results in a more “al dente” texture, whereas baking it whole essentially steams it and leaves you with a softer, wetter texture. Either way works just fine with a sauce, but I prefer firmer “noodles.” It also takes less time to cook when cut in half. The one caveat is that you need a very good, large knife, otherwise cutting through the squash will be nearly impossible. I have been there and it wasn’t pretty!

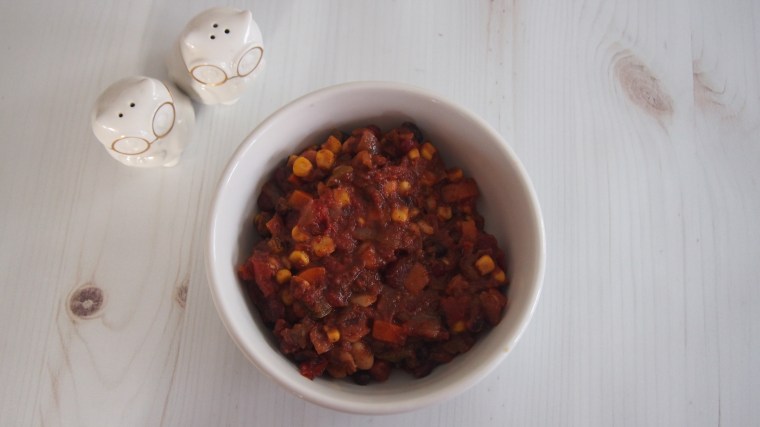
When it comes to tomato sauce, I love adding mushrooms and lentils for a hearty, healthy, and filling combo. Mushrooms are meaty and a good source of antioxidants, and lentils–packed with protein, fiber, and a range of vitamins and minerals–are a nutritional all-star. You could use dry lentils in this recipe and cook them first, but I’m all about easy, so I go with organic canned. Aside from chopping the veggies, there’s not much more to this sauce! Just throw everything in a pan and let it cook. It doesn’t get much easier than that.

So tell me, are you a fan of spaghetti squash? What are some of your favorite spaghetti squash recipes to make at home?

Raw Spaghetti SquashRaw Spaghetti SquashRoasted Spaghetti SquashCremini MushroomsSpaghetti Squash with Mushroom & Lentil Sauce

Ingredients

  • 1 large spaghetti squash
  • 5 cloves garlic
  • 1 large onion
  • 1 10-oz package cremini (aka baby bella) mushrooms
  • 1 25.5-oz jar of basic tomato sauce (I used Muir Glen’s organic tomato basil)
  • 1 14.5-oz can diced tomatoes
  • 1 14-oz can lentils
  • 1 tsp basil
  • 1/2 tsp oregano


Directions

For the squash

  1. Preheat oven to 425
  2. Line a baking sheet with tin foil and spray it with a bit of olive oil.
  3. If baking the squash whole, pierce the skin in several places and place it on the baking sheet. Bake for about 45-60 minutes, until a knife easily cuts through the skin and flesh. If the squash is very large, it may take longer to cook. Let the squash cool for a few minutes and then cut it in half lengthwise. Remove all the seeds and pulp. Use a fork to pull out spaghetti-like strands of squash.
  4. If baking the squash cut, use a large, sharp knife to cut the squash in half lengthwise. If you make shallow cuts along the area you want to cut, the knife should go in a little easier. Scoop out the seeds and pulp. Rub a little olive oil onto each of the squash halves and then place them cut-side-down on the tin foil.
    Bake for about 30 minutes, until a knife easily cuts through the skin and flesh. If the squash is very large, it may take longer to cook. This is optional, but I like to turn the squash halves over and let them bake facing up for a few minutes, to crisp up the flesh a little more. Let the squash cool for a few minutes. Use a fork to pull out spaghetti-like strands of squash.

For the sauce

  1. Lightly coat a saucepan with olive oil
  2. Chop the garlic and onion and add to the pan, cooking on medium-low for about five minutes, stirring occasionally
  3. Chop the mushrooms and add them to the pan and stir. Let the vegetables cook for another few minutes.
  4. Add the jar of tomato sauce, diced tomatoes, lentils, and spices, and simmer for about 30 minutes, until vegetables are tender.
  5. Top spaghetti squash with sauce.


Spaghetti Squash Mushroom Lentil

Simple Vegan Cornbread

Vegan Cornbread

Hi there! I hope my fellow East Coasters are staying warm and safe in the big snowstorm. What a winter we’ve had already and it’s only the beginning of January! Yikes. Anyway, I wanted to follow up yesterday’s chili post with a recipe for cornbread since the two so often go hand in hand. I was planning to include the cornbread recipe along with the chili, but the first version I made was just not up to snuff and I wanted to tweak it before sharing. In my first attempt, I tried going the no oil route and used apple sauce in its place. While this swap works in many recipes, like brownies, it did not work for this cornbread. It turned out waaay too dry and crumbly. I also used too large of a pan (13×9), which resulted in slices that were a bit too thin for my liking. For my second attempt, I used coconut oil and a smaller 9×9 pan, and the result was just what I was going for–moist, hearty, and delicious!

Vegan CornbreadVegan Cornbread

Most cornbread recipes, like the original recipe I used as inspiration, call for cornmeal and regular wheat flour, but I opted for oat flour instead of the wheat to keep the cornbread gluten free. You could go either way.  I topped it with a pat of Earth Balance (admittedly not as large as in these photos) but a vegan maple butter would be even better! Like the majority of things I make, this is super easy to whip up and won’t leave you with a stack of dishes to wash at the end. I hope you try it and enjoy!

Ingredients

  • 2 cups unsweetened almond milk
  • 1.5 tbsp apple cider vinegar
  • 2 cups cornmeal
  • 1 cup oat flour
  • 2 teaspoons baking powder
  • 1/2 tsp salt
  • 1/2 cup coconut oil, melted
  • 1/4 cup maple syrup

Directions

  1. Preheat oven to 350.
  2. Mix the almond milk and apple cider vinegar together in a bowl and let sit for 5-10 minutes.
  3. In a separate bowl, mix the cornmeal, oat flour, baking powder, and salt together.
  4. Warm the coconut oil in the microwave (or on the stove) until it’s melted. Add the coconut oil and maple syrup to almond milk/vinegar mix and stir well.
  5. Add the oil mixture to the dry mixture and stir until well mixed. Pour the batter into a greased (I used coconut oil) 9×9 pan and bake for about 45-55 minutes, until bread is firm. 
    *Adapted from Isa Chandra’s Vegan Cornbread

Note: To store this, make sure to use an airtight container or wrap it extremely well. I simply put a piece of tinfoil over the leftovers kind of haphazardly and it dried out pretty quickly. Don’t be lazy like I was!


Simple Vegan Cornbread

Three Bean & Veggie Chili

Hello and Happy New Year! I hope you had an enjoyable holiday, however you chose to spend it. We party animals over here ordered in Thai and were in bed by 10pm, ha. I’ve never been a huge New Year’s Eve person to begin with and now that I have a little one, it’s all the more reason to lay low and have a relaxing night at home. The freezing cold weather was another motivator for staying in close to the fireplace. Feels like 1 degree? No thank you!

Speaking of the weather, given how frigid it has been the past week, I wanted to make something warming and hearty for dinner New Year’s day. What better than a big pot of chili? This version is packed with fiber-rich beans (three different kinds, in fact!) and veggies to fill you up and keep you satisfied for hours.

Veggie Chili

It’s also low in sodium and fat. Tomato products tend to be loaded with sodium so I always try to buy versions that are low sodium or no salt added, like I used in this recipe. Personally, I find the other seasonings to add enough flavor that I don’t even add any salt to my bowl, but it’s easy enough to salt it to taste. Best of all, this is beyond easy to throw together and can last for several meals. The next time you’re on the hunt for a wholesome and delicious veggie chili recipe, I hope you give this one a try! If you do, let me know how you like it.

Veggie Chili

Veggie Chili


Ingredients

  • 2 large yellow onions
  • 3 cups of carrots (about 3 large)
  • 3 peppers (I used 2 green and 1 red but any combo will work)
  • 6 cloves garlic
  • 3 14.5 oz cans diced tomatoes, no salt added
  • 6 oz can tomato paste
  • 2 cans kidney beans, no salt added
  • 2 cans black beans, no salt added
  • 1 can white beans, no salt added
  • 3 tbsp chili powder, or to taste
  • 3 tsp ground cumin
  • 1/2 tsp cayenne pepper
  • 1 16 oz bag of frozen corn (I like the fire roasted kind from Whole Foods or Trader Joe’s)

Directions

  1. Spray the bottom of a large soup or stock pot with oil (you can also use veggie broth if you’d prefer not to use oil).
  2. Chop onions, carrots, peppers, and garlic and add them to the pot. Set on medium/low and let the veggies cook for about 10 minutes, stirring occasionally to make sure they don’t stick.
  3. Add in the diced tomatoes and tomato paste.
  4. Drain and rinse the beans and then add them to the pot and stir well.
  5. Stir in all the spices and let the chili cook on low for about an hour to 90 minutes, until all the veggies are tender.
  6. Add in the frozen corn and stir again. Leave it for a few minutes to warm.
  7. Season with salt and pepper to taste.

Note: This recipe makes a LARGE pot of chili. I always like to make a big batch so that it can provide multiple meals. Sometimes I even freeze some of the leftovers to have later.  If you’d rather make a smaller amount, I suggest just halving the recipe.

Three Bean Veggie Chili

Mexican Quinoa Stuffed Peppers (Vegan & Gluten Free)

Mexican Quinoa Stuffed Peppers

For some reason I never think to make stuffed peppers, even though they’re one of the easiest and most versatile things to make on the planet. But inspiration struck on Sunday. I had two cored out peppers left over from a crudités platter I bought on Saturday and it was pretty obvious what I should do with them. Based on the ingredients I had lying around, I decided to do a Mexican version with quinoa as the base. A little corn and onion, some black beans, tomatoes, and fresh cilantro, and voila! A delicious and spontaneous meal that was on the table in about 90 minutes. 

You can stuff peppers with just about anything you want. Rice is popular, as is ground meat, but I personally love the texture of quinoa and think it works great in this recipe. And you can’t get any easier or healthier than canned beans (just make sure you get beans without salt or any other junk). I chose to use black beans in keeping with the Mexican food theme but you could use any kind of bean you like or even a mixture of beans. Anything goes! If you’re looking for a simple and quick recipe that’s big on flavor, give these stuffed peppers a try. 


Mexican Quinoa Stuffed Peppers

Mexican Quinoa Stuffed Peppers

Ingredients

  • 4-5 large bell peppers
  • 1 cup quinoa
  • 1 cup frozen corn
  • 1 15 oz can black beans
  • 1  14.5 oz can stewed tomatoes
  • ⅓ cup chopped red onion
  • Juice of half a lime
  • 2 tsp cumin
  • 1 tsp chili powder
  • 1 tsp garlic powder
  • ½ tsp onion powder
  • ½ tsp paprika
  • A few bunches of fresh cilantro

Directions

  1. Wash peppers, cut their tops off, and discard the seeds. Place peppers on a 13×9 baking dish and set aside.
    Preheat oven to 375 degrees F.
  2. Add quinoa to two cups of water in a pot and bring water to a boil. Once boiling, turn heat to low and cover. Let cook for about 15 minutes or until water is absorbed. Add frozen corn to hot quinoa and stir.
  3. Transfer quinoa and corn mixture to a mixing bowl.
  4. Rinse and drain black beans and add to quinoa and corn mixture.
  5. Add the stewed tomatoes with juices. Slice large tomato chunks into smaller pieces.
  6. Add red onion, lime juice, and all the spices and cilantro. Mix well.
  7. Lightly brush outsides of peppers with olive oil and spoon quinoa mixture into each pepper shell until mostly full.
  8. Bake for about 50 minutes to an hour, until peppers are tender.

Note: I’d add avocado to these as a topper but didn’t have any on hand when I made this batch. Although definitely not a necessity, I think avocado would take these peppers to the next level!

Mexican Quinoa Stuffed Peppers

Lentil and Green Pea Veggie Soup

Lentil green pea.png

We had a few blissfully warm days over the past couple of weeks but this weekend the deep freeze returned, and there’s a snowstorm in the forecast for tomorrow. A really big one apparently. Womp womp. We’re exactly a week away from the first day of spring, so let’s hope this is winter’s last hurrah before the temps start climbing for good. I’m so ready for warm weather and sunshine!

When it’s this cold outside I like to warm up with a nourishing bowl of soup. As much as I like salads, I often crave something hot for dinner in the winter and don’t find salads so appealing. I don’t want to forgo all my veggies though and that’s where soup comes in! A hearty veggie soup packs in loads of healthy and fresh ingredients while offering the comfort of a warm dish. This lentil and green pea veggie soup is a family fave that I make all throughout the winter months. It’s filling and flavorful and incredibly easy. Whenever I’m making soup I always double or triple the recipe and make a giant pot so that we can eat it for several nights. You can also freeze it if you want to have some on hand for later, but we always wind up eating it all and don’t have any left over to freeze!

I didn’t measure the quantity but it makes a lot. I’d guess about 12 cups! If you wind up making it and measure it out, let me know.

Lentil & Green Pea Veggie Soup

Ingredients

  • 4 tbsp low sodium vegetable broth
  • 2 large yellow onions, chopped
  • 1.5 cups chopped carrots
  • 1 cup chopped celery
  • 1 large sweet potato
  • 4 large garlic cloves, finely chopped
    3 tbsp curry powder
  • 1 tbsp turmeric
  • 2 cups uncooked green lentils, rinsed thoroughly
    7-8 cups low sodium vegetable broth
  • 1 cup frozen green peas
  • 1 cup frozen spinach
  • salt & pepper to taste

Directions

  1. Add 4 tbsp vegetable broth to an extra large skillet or pot placed on medium heat. Add chopped onion, carrot, celery, sweet potato, and garlic. Cook for about 10-15 minutes, stirring occasionally, until vegetables are tender or at least starting to soften.
  2. Add 7 cups of vegetable broth to the pot along with the uncooked lentils. Add the curry powder and turmeric.
  3. Bring to a boil and then reduce the heat to medium/low and simmer until the lentils are tender, about 45 minutes. If you notice that you need more liquid, add up to a cup more of veggie broth to thin out the soup.
  4. Add in frozen peas and spinach and stir until heated through. Add salt and pepper to taste.

*Adapted from the Oh She Glows Curried Lentil Soup recipe

OLYMPUS DIGITAL CAMERA


P3120484v2.jpg

OLYMPUS DIGITAL CAMERA


Everyday Banana Bread (Vegan)


Everyday Banana Bread

For some reason I always seem to have overripe bananas lying around. I don’t mind though because overripe bananas make the very best banana bread! It may sound gross but I like to wait until bananas have turned completely black on the outside before I bake with them. At that point, I know they’re bursting with flavor and will infuse any baked good with banana-rich goodness. I had three of these perfectly ripened bananas in the house yesterday and my husband was starting to get repulsed by looking at them, so it was a great excuse to whip up a loaf of my favorite banana bread.

I’m a huge fan of this banana bread recipe because it requires just a handful of healthy ingredients and isn’t loaded with sugar or fat. I can eat a slice for breakfast without feeling like I’m starting my day off with a piece of cake, and that’s not something I can say for most quick breads. I typically top it with a dab of peanut butter but you can add any spread you like, or eat it plain, whatever strikes your fancy!

OLYMPUS DIGITAL CAMERAOLYMPUS DIGITAL CAMERAOLYMPUS DIGITAL CAMERAOLYMPUS DIGITAL CAMERA

Ingredients

  • 1 cup of oat flour
  • 1 cup all-purpose flour (you can use all all-purpose if you prefer)
  • ⅓ cup sugar
  • ½ tsp baking powder
  • ½ tsp baking soda
  • 3 medium, very ripe bananas
  • ½ cup applesauce
  • 1 tbsp coconut oil

Directions

  1. Preheat oven to 375 degrees.
  2. Add the first five ingredients to a large bowl and combine.
  3. In a medium bowl, combine the remaining three ingredients. If necessary, mash the bananas until mostly blended (some chunks are okay).
  4. Add the wet ingredients to the dry ingredients in the large bowl and mix until well combined. The batter will be very thick.
  5. Pour the batter into a greased loaf pan.
  6. Bake for about 45 minutes or until a toothpick comes out clean.

Adapted from Peaceful Dumpling’s Best Vegan Chocolate Chip Banana Bread


EveryDay Banana Bread

Hearty Pumpkin Pancakes (Dairy Free)

Hearty Pumpkin Pancakes

I realize pumpkin craze season is long gone but I had to use up some pumpkin puree and was in the mood for pancakes yesterday, so this recipe combining the two hit the spot. I love that it’s chock full of pumpkin — seriously, a whole 15 oz. can! — and light on oil and sugar, so it’s something I can feel good feeding my family, even if it’s more decadent than our usual breakfast. I’d describe these pancakes as dense and cake-like vs. light and fluffy, but they’re truly delish and have become a fast favorite in my pancake rotation. If you’re looking for something to do with your leftover pumpkin like I was, or simply want to try out a new pancake recipe, give these pumpkin pancakes a try. I hope you enjoy them as much as I do!

Hearty Pumpkin Pancakes
Makes 8-10 large pancakes

Ingredients

  • 1 15 oz. can pure pumpkin puree (not pumpkin pie filling, which is loaded with sugar)
  • 1 large egg
  • ¾ cup unsweetened almond milk (or other milk of choice)
  • 1 tbsp melted coconut oil
  • 1 cup oat flour
  • ½ cup all purpose flour
  • 2 tbsp cane sugar
  • ½ tsp cinnamon
  • ½ tsp baking soda
  • 1 tsp baking powder
  • Coconut oil for sautéing

Directions

  1. Add the first 4 ingredients to a medium bowl and mix until well combined.
  2. In a second bowl, add the remaining ingredients and mix until well combined.
  3. Add mixture from the second bowl to the mixture in the first bowl and mix until blended.
  4. Get a large skillet nice and hot by placing over medium heat and add a tablespoon of coconut oil to prevent sticking. Pour pancake batter into the skillet using a measuring cup or spoon, and saute until firm enough to flip (about 3 minutes), then saute on the other side for another few minutes. Repeat until there’s no more batter left, adding more coconut oil to the pan as needed. Top with maple syrup and enjoy!

*Adapted from Natasha’s Kitchen’s Pumpkin Pancakes

OLYMPUS DIGITAL CAMERA

OLYMPUS DIGITAL CAMERA

OLYMPUS DIGITAL CAMERA

What’s your favorite pancake recipe?

hearty-pumpkin-pancakes-header-pinterest


Healthy Homemade Chocolate Truffles (Gluten & Dairy Free)

Homemade Chocolate Truffles

Truthfully I’ve never been much of a Valentine’s Day person, single or not. I think it makes single people feel bad and puts pressure on people in relationships to come up with some grand gesture of love on an arbitrary day. That said, I am a chocolate person and can get behind any excuse to eat more of it! With that in mind, I wanted to share a quick, healthy and delicious recipe for homemade chocolate truffles.

My sister discovered this recipe years ago and she makes the truffles every year over the holidays. They’re a big hit! But I think they’re a perfect treat for Valentine’s Day as well. On top of being super easy, the recipe is also healthy and free of junk! It uses just a few wholesome ingredients and is dairy and gluten free–if you’re someone who cares about that. Best of all, they’re seriously tasty. Whip up a batch and give them to a loved one or simply treat yourself!

Healthy Homemade Chocolate Truffles
Makes 12-14 large-sized truffles

Ingredients

  • 1 cup almond flour or almond meal
  • ¾ cup cocoa powder
  • ⅓ cup honey
  • 1.5 tbsp coconut oil, melted
  • Unsweetened shredded coconut (optional)

Directions

  1. Add all ingredients except for coconut to a large bowl and mix well until you have a very firm “dough” (You don’t need an electric mixer. A wooden spoon and good old elbow grease will do!). If mixture isn’t holding together well, add a little more coconut oil.
  2. Form truffles by rolling small amounts of the mixture in your hands.
  3. If using coconut, put coconut in a separate bowl and dip each truffle in the flakes to coat the outside. You could also use crushed peanuts or pistachios, or really anything you like!
  4. Put truffles in the refrigerator to harden. Keep in the refrigerator until ready to serve. You can also freeze them for longer-term use.

*Adapted from Kimberly Snyder’s Raw Cacao Truffles recipe

OLYMPUS DIGITAL CAMERAOLYMPUS DIGITAL CAMERA

If you make these, let me know how you like them!

oatmeal cookies